Hopefully Not Like This
THE BEGINNING
I've decided to attempt to build a cat wheel. I have never attempted anything like this before so I am hoping there will be minimal mistakes, complications and injuries.
I have no experience working with wood, so this may be quite the catastrophe in the making. If anyone ends up reading this that knows more than nothing please feel free to offer suggestions and corrections in the comment section.
I have searched online for instructions and guides for how to do this, but there hasn't been much to go by. I found a few other people who have successfully attempted this before who I have generally followed and received inspiration from for my construction. Primarily I have used Crystal W's video (http://youtu.be/LEdnCGfoHkM) as my main guide.
I also looked over Stitches & Sew's blog (http://stitchesnsews.blogspot.com.au/2013/02/home-made-cat-wheel.html) and Nicheven's video (https://www.youtube.com/watch?v=m5Y3lNRp8cs). Various bits and pieces were taken from each source.
Nicheven emphasised their disclaimer for non-liability, etc. So, while I dont think it is necessary, I might as well play it safe and claim that this blog is not a recommendation for how others should assemble a cat wheel, but if any individual chooses to do so then any consequences that come about as a result of their attempts are the sole responsibility of the individual, not the writer, me...dont sue me....Im talking to you, Americans....and other nations too.
Most other sources use imperial measurements when describing their construction, but as Im in Australia Ill be using metric. Also, nearly all of my materials were purchased from Bunnings, so while there may be different products or dimensions that are preferred I pretty much stuck to what was easily available at my local Bunnings.
MATERIALS
At the time of writing this post I have only just started and I am expecting to make a few more runs to the shop before Im done. I may update this original post as I go with all the materials Ive used, or I may just mention it as I go in subsequent posts. But for now I have started with the following materials:
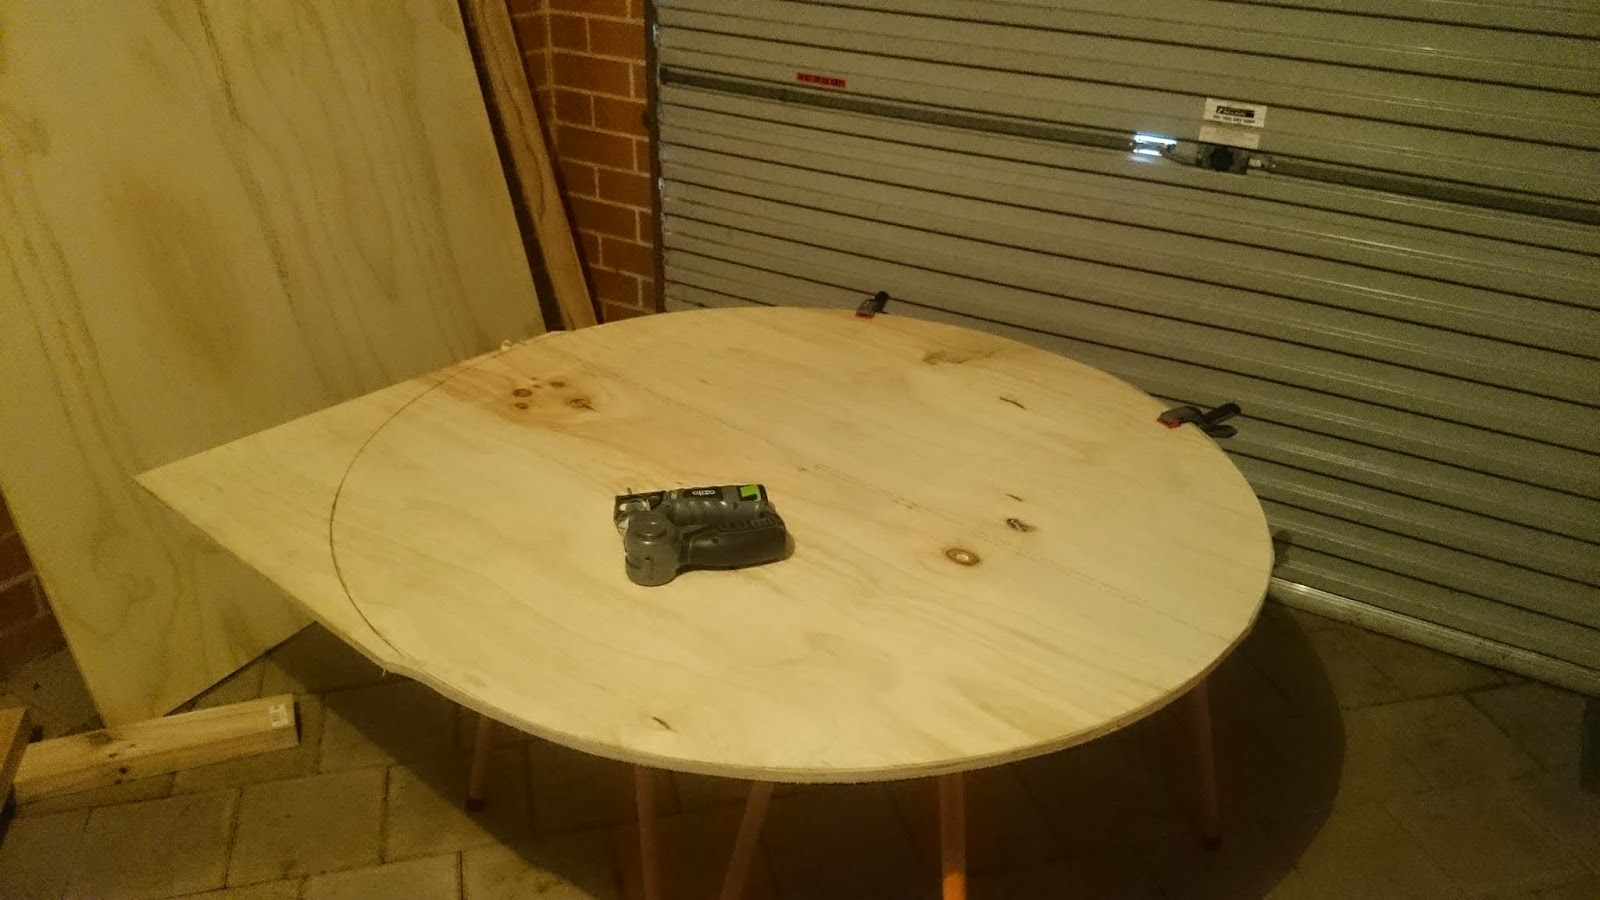
1x 12mm, 1198mm x1200mm, sheets of plywood
this is for the main backboard of the wheel. It came pre-cut at my local store, most other places sell it as 1200x2400 sheets. I assume the saw used loses 4mm.
3x 3mm, 810mm x 1200mm sheets of plywood.
these will make up the inside track. At the time of writing this post I havent decided what I will use for the outside of the wheel so I may need more of the same, or else I will get something of a bit nicer quality.
6 or so 42mm x 19mm x 1.2m pieces of timber.
these are for the beams for the track to attach to.
3x 90mm x 45mm x 1.2m
these are for the frame. (I will definately need more for the frame.)
1x castor
for the rotating mechanism.


THE WHEEL
I decided to go with a wheel 3660mm in circumference/1165mm in diameter. This size was chosen with the hope that it would make the construction of the track easier due to the length of the 3mm ply dividing evenly into the wheel circumference and hopefully making it easier for myself and smoother for the cats. However, I think I will be using the width of the 3 mm ply and cutting along the length due to the grain of the wood naturally bending in this direction which I assume will make the track placement easier. We'll see.
I measured out the circle using a string the length of the desired radius (582.5mm) tied to a nail in the centre of the 12mm ply and a pencil at the other end of the string. To cut the circle I used a cheap Otizo jigsaw that I managed to pick up. Im using the cheap version of most things that are needed due to this being my first attempt at woodwork and if it doesnt work out I may never do it again. The cut quality is definitely good enough for me, no issue there, but I imagine other saws would have a lot more power behind them, and the battery life is fairly poor. Fortunately it comes with a spare battery that can be on the charge while I use the other one.
I bought a set of extra blades for the saw so I could have a selection for various purposes. The one I used for the circle was the one recommended for fine cuts and curves. No need to doubt the packaging.


Next I'll be starting the frame and/or starting the track, depending where the mood takes me.
No comments:
Post a Comment